How to Make a Website With Joomla
These days it is very easy to build a website for yourself. You don’t even need to know programming. In this article I will explain how to build a professional business website using the Joomla CMS.
Joomla is the second most popular content management system, after WordPress. The software has been downloaded over 50 million times since its first release back in 2005.
Top websites such as the Harvard University or The Alliance for Catholic Education University are based on Joomla. Not only universities are relying on the power of this great CMS but also news websites and portals just like Linux.com, TheHill.com, MTV Greece, and others. The knowledge section of InMotion Hosting is also based on Joomla.
In the following I will walk you through the process of creating a Joomla website from scratch:
- Choosing the right Joomla host
- Installing and configuring Joomla
- Installing extensions, templates and publishing articles
Are you ready to start?
1. Choose the perfect Joomla web host
Most of the time people find it difficult to choose a good web host. With so many hosting plans and companies available on the market it is very hard to decide which the right plan or firm is to go with. With Joomla it is even harder to find a reliable web hosting provider.

Many hosting providers offer tools that allow you to install Joomla to your website within couple clicks. This does not mean that they are a good Joomla hosting provider. Because Joomla is resource heavy software, it needs a reliable hosting plan. Wrong hosting choice will lead into slow website performance.
On our joomla hosting page we have described how the ideal Joomla hosting provider should be. Here you will also find the top 3 companies we recommend for hosting your Joomla website.
1.1 Choosing the right hosting plan
Even though Joomla will use more server resources, you don’t have to go straight for a VPS or dedicated server. Joomla will run smoothly on a shared hosting account as well, but it really depends on what type of website you are building.
For instance, if you are creating a website for your company, presenting the services or the products your business is offering, and your website receives around 500 unique visitors a day, shared hosting is the way to go.
If you are planning to run a forum, a community website or an ecommerce website, that most likely will used by many users at once, you should definitely opt for a virtual server.
Whatever Joomla site you are building, make sure that the hosting you are going to choose is supporting the software. Not only with free installation tool, but also with some sort of tutorials, or live support help.
InMotion, for example, has a large database of Joomla tutorials that you can access for free and learn how to build, edit and fix things in Joomla. They also offer Joomla optimized hosting, that means, your website will be placed on a server which was setup and customized for Joomla websites. At InMotion as your website grows, you can opt for greater hosting plans, making the upgrade and downgrade between packages easy.
2. How to install Joomla?
When it comes to installing Joomla to your website, you have two options: manual and automatic installation. The automatic installation, more exact, the installation of Joomla using a tool is simple. Very minimal user interaction is required.
While the manual installation requires a bit more effort, because files have to be uploaded manually to the server, database has to be created by the user, and the installation process will take longer.
In the next part of this tutorial I will show you both metods. The manual installation can be performed on any web hosting server that support MySQL and PHP, while the automatic installation will be presented on InMotion’s cPanel hosting plan.
2.1 Install Joomla Manually
If you are building a new Joomla website from scratch, you should always use the latest stable version from Joomla.org, download it for free. Download the archived file and save it to your computer.

Once it is done downloading, using an FPT client or using the FileManager from your hosting panel, upload and extract files to the server. Upload the files to the domain’s folder on which the system will be installed.
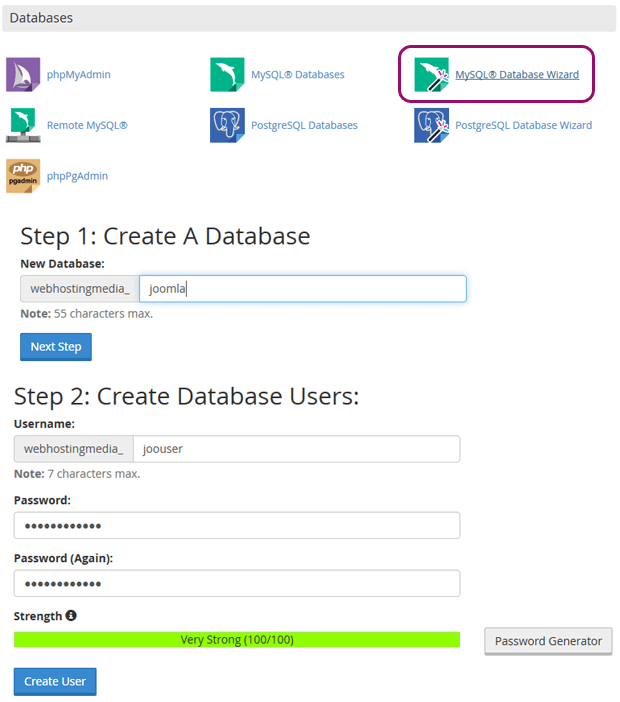
The upload of the files will take a while, but in that time you can create a MySQL database. Accessing the MySQL Wizard tool in the hosting control panel, you will be able to set up the database. Here are the steps you have to follow (documented with screenshots below):
- Step 0 – access MySQL Wizard tool
- Step 1 – create database
- Step 2 – create database user and set a strong password
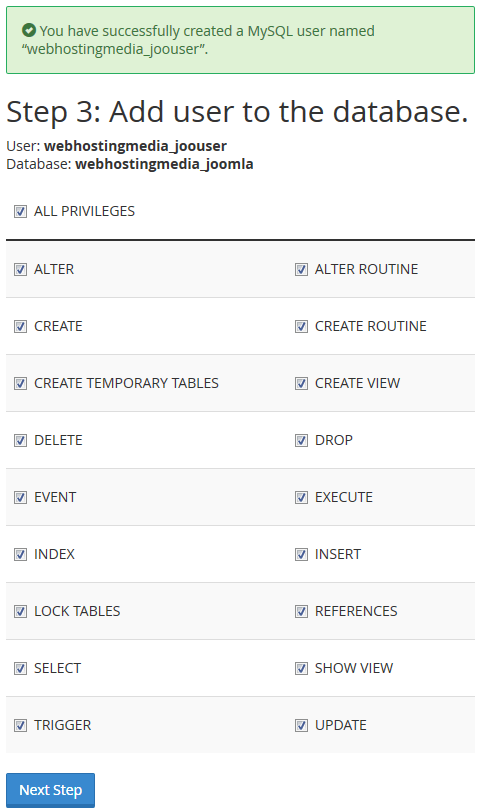
- Step 3 – add user to database with “All Privileges”
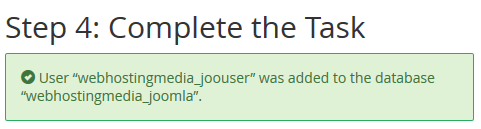
- Step 4 – complete the taks
Once the files are uploaded and the database is ready, you can start the installation of Joomla by accessing your domain name.
You will go through the following 3 steps:
1. Configuration – here you will have to set website title and Super User (administrator) login information. The language of your website will also be selected here. By default every Joomla installation is set to be installed in English, but you can choose another language from the drop-down menu.

2. Database – here you will connect the Joomla files with the database you have created earlier; just add the database name, database user and the password and get to the next step

3. Overview – here you can opt to install some sample data to your site, or you can just leave everything blank. If everything set, finish the task by clicking on the “Install” button.

The installation will take a few seconds.

If everything went ok, the following screen will appear. Click on the “Remove installation folder” button and you are done. Now you can visit your site or access the administration area.

2.2 Install Joomla Automatically with Softaculous
With InMotion you can install Joomla automatically from cPanel. On signup, you will get all the details you need for accessing the cPanel account. Once you login to your hosting account control panel, scroll to the bottom of the page and look for the Joomla logo.

By clicking on the small Joomla icon, you will be redirected to a new page: Softaculous, where you can choose the domain on which you want to install Joomla. Here is a detailed tutorial on how to install Joomla to InMotin Hosting.
Here is a video that explains how Softaculous works:
3. Setup your Joomla website
As this point, your website is online. You can now go and publish articles, upload images and setup contact, about and other pages. But if you are planning to build a professional website out of Joomla, you will want to do more adjustments to it. For instance, Joomla comes with a very bad URL structure. The default design that comes with Joomla 3 looks very plain and simple. In the following I will show you how to make the necessary changes and customize your Joomla website to look good for both your website visitors and search engines.
To login in the back-end of your Joomla website, you will have to access the following page: yourwebsite.com/administrator , type in the admin user and password that you have set during Joomla installation and start the configuration of your website.
3.1 Change Global Configuration and activate SEF URLs
You should start with the configuration of your website in Administrator / System / Global Configuration section. Here you can change website status. If you want to hide it from the nosey eyes during development, you can put the site offline here. In this section you can also change website title, change content editor, set meta description and meta tags for the homepage. In the Global Configuration you can enable Search Engine URLs too use URL rewriting.
To enable the URL rewriting, you will have to rename the htaccess.txt file to .htaccess and make it writable (this file is located in the root joomla installation and can be accessed via FTP or FileManager).

Still here, you can enable the Gzip Page Compression as well configure Cache settings. This however should be only enabled once your website is ready for public use.
3.2 Create Categories and Publish Articles
The next step is to create the website structure, by adding the necessary categories. At this point, you don’t need to upload all your content, but some articles are needed to be able to set up menus and pages. If you have installed sample data, you can use these for the moment; however do not forget deleting all sample data once you are done. To create categories and articles go to: Administrator / Content / Categories.
3.3 Install Necessary Extensions: Modules, Plugins, Components
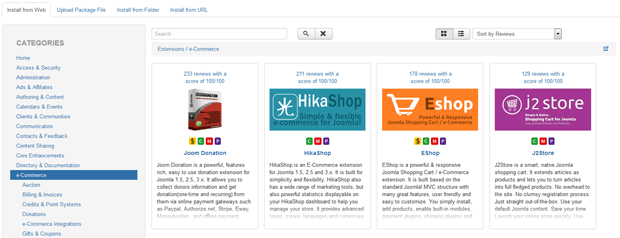
In the Joomla extensions directory there are over 7000 listed extensions. There are hundreds of more that are not listed here. Some of them are commercial, but most of Joomla extensions can be used for free. Do not over-commit with installing too many modules or components to your website. Too many extensions will slow down your website, so only install those that will be used. Install modules, plugins and components at Administrator / Extensions / Manage.
3.4 Create Menu Categories and Menu items
Now you can create the menu structure. First, add a menu category and then add the menu items. When creating a new menu item, you can choose from a long list of menu types. Menus can be linked directly to a single article, to blog, category, etc. It can also be linked to a contact form as well to other extensions. You can also create menu items with custom URLs, even external linking menus. Do this at Administrator / Menus / Manage.
To have a drop-down menu on your website, it is required to add sub-menus as well. Most templates comes with pre-styled drop-down menus, but you can always find a nice responsive drop-down menu in the extensions directory if the template you like does not come with this in-built feature.
3.5 Install and change Template
If you are on a limited budget, you can install a free Joomla template to your website. There are typically hundreds of websites where you can find professional templates and download them for free.
If you can afford to pay for the template, you can join a Joomla template club, where you will be able to choose from tens of different templates, or you can check out ThemeForest, where you can choose from more than 650 premium Joomla templates.

Always choose a template, that comes with a sort of documentation, otherwise it will be pretty hard to figure out how to set it up and find the module positions.
Install the template via the extension installer and enable it at Administrator / Extensions / Templates. Once your template is active, you can publish the modules to the positions that are available with the template.
3.6 Setup and publish Modules
The core Joomla installation comes with lots of in-built modules. If you have choose to install sample data, there are some modules available in the Module manager, otherwise you will need to create modules yourself at Administrator / Extensions / Modules.
Create the modules you need and publish them to the available module positions. Here are few suggestions of the most common used modules:
- Menu Module
- Custom HTML
- Login Module
- Search Module
- Latest Articles
- Tags Module
- Slideshow Module
The modules are a very important part of your website, because these breaks up the plain, boring article layout and make your website more fun.
Are you ready to start with your Joomla website?
I tried to make this tutorial as detailed as possible; however there are still some parts that have not been detailed as much as I wanted. I promise that I will do more tutorial on Joomla in the next couple of weeks. I truly believe that with this guide you will be able to get started with your Joomla website. If you don’t have a web host yet, I recommend you checking out InMotionHosting.com offer. Click on the link to get 47% discount from web hosting and a free domain name as well.
If you have any questions or suggestions on how I can improve this tutorial, please do not hesitate to leave your feedback in the comment section below. Good luck with your website!
David Cross
David is the chief editor at WebHostingMedia right from the beginning. He has a great passion for building and managing websites and creating helpful content. He is also interested in programming - currently learning python.
Latest Articles
 Reasons to Incorporate Technology in Every Business OrganizationNovember 11, 2023
 Managing a Shared Hosting Account – Tips and TricksMarch 24, 2023
 Your Real Estate Website Should Have These FeaturesMarch 23, 2023
 8 Interesting Facts About Mobile Apps DevelopmentDecember 10, 2022
 Understanding How Payment Gateways WorksNovember 25, 2022
Thank you for your excellent article, it really helped me in choosing joomla hosting.
Joomla is one of the best and most favorable platform for website creation, easiest way to host a website. Thank you for sharing a nice information about Joomla services.