8 Easy Steps to Build a Professional Website with iPage.com
Building a website these days is super easy. There are so many tools available that will speed up the process and will significantly decrease the difficulty level as well. If you want to have your own website, you may want to consider using a content management system or a blogging platform like Joomla or WordPress or you could use a site builder.

The fun part of these tools is that, it does not require any programming skills, anyone who can create a Word document, can learn how to use WordPress or how to publish a website with a site builder. In this article I will show you how to create a simple professional looking website with iPage’s website building tool.
iPage offers a wide range of hosting plans for both individuals and businesses. The company has been in business since 1998. Their most popular plan is the inexpensive shared hosting, that comes with a range of great features, the drag and drop site building tool being one of them. If you want to know more about the company please check out the page where you can find expert and customer reviews on ipage.
The signup process to iPage is straight forward, you can register a new domain for free or you can use your existing domain, just need to change name servers when your account is ready. After filling the personal and payment details, an email will be sent to the email address you gave them with all the necessary information to access your account.
Now you have your iPage account registered and confirmed; you can now start building your website.
Create a website with iPage’s drag and drop site builder?
If you have registered your domain with iPage, during the signup process, you don’t have to do anything, just follow the steps below. If your domain is registered somewhere else, you will have to change the name servers to ns1.ipage.com and ns2.ipage.com and add the domain to your account in the DomainCentral section. The change of the name servers may take a while, so don’t worry if it is not working right away.
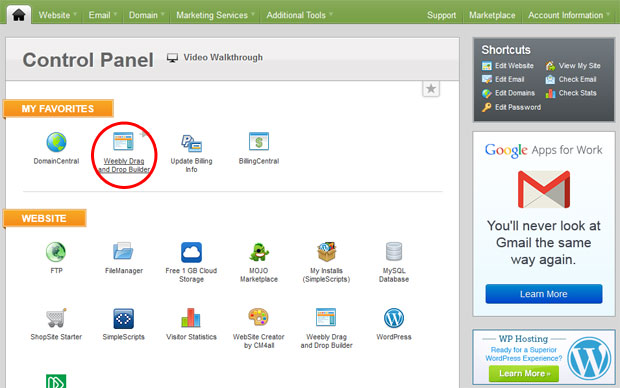
Step 1: In the home page of your hosting control panel you will have to find an icon that is called Weebly drag and drop builder. By clicking on this icon will redirect you to the website builder.
Step 2: By clicking on the “Add Website” button you will have the possibility to choose the domain name you want to publish the website on (if you have multiple domain on your account).

Step 3: After adding your domain to the website builder, click on the “Edit Website” button. This will open up a new window that allows you to physically build the website.

Step 4: In the Design section of the builder you can pick a theme that you like. There are lots of designs available and you can use them for free. If you already have a template, you can upload it by clicking on the “Import Theme” button.

Step 5: After setting up the design, in the Build section you can add the web elements you need. You simply click on the element you want to add, drag it to the page and drop it to the desired position. You can add images, text areas, slideshows, galleries, maps, contact forms, buttons, can change the layout by adding columns, etc. The limit is your imagination.

Step 6: In the Pages section you will be able to add new pages. Here you can choose a basic layout for the page. The pages you add here, will automatically be added to the main menu. In the basic hosting package you can add up to 6 pages, however if you need more, you can upgrade your account later on.

Step 7: If you are done with all the building and editing, now go to the Settings, and finalize the website. Here you can choose the favicon (that small image that will appear in the browser tab), can configure SEO, if your site will sell any products or services PayPal can be added as merchant account and can choose if you want to enable or disable the responsive layout (I suggest to enable the mobile-optimized layout for better user experience).

Step 8: Now you can hit the Publish button, and your website will go live. Don’t worry if later you realize that something is wrong, you can edit your site anytime.
Also Read: How to Create Your Website in 3 Easy Steps with Weebly.
After you website is online, you can start the advertising. There are lots of options on how to bring targeted traffic to your site; you can start using Google, Bing and Facebook network with the free advertising credits you get from iPage. You can also share your site on your social accounts. But don’t get to crazy promoting your website, and don’t annoy your friends with it.
To be more professional, you have the option to create an email address similar to your_name@domain.com, and use this on your website.
If it may happen to have any question or you are stuck during the website building process, please contact iPage’s support with confidence. They are available 24/7 and they are very kind and trained for this job.
David Cross
David is the chief editor at WebHostingMedia right from the beginning. He has a great passion for building and managing websites and creating helpful content. He is also interested in programming - currently learning python.
Latest Articles
 Reasons to Incorporate Technology in Every Business OrganizationNovember 11, 2023
 Managing a Shared Hosting Account – Tips and TricksMarch 24, 2023
 Your Real Estate Website Should Have These FeaturesMarch 23, 2023
 8 Interesting Facts About Mobile Apps DevelopmentDecember 10, 2022
 Understanding How Payment Gateways WorksNovember 25, 2022